Niece III's Robe A La Francaise (Or something)
Also can be titled. 'I'm DRAFTING/DRAPING BIOTCHES' or 'OMG WHY DID I THINK THIS WAS A GOOD IDE!??' Or 'Family Historical Portrait, Take Three"
18th century. Pocket Hoops, Big Hair, things embellished with the same zealous fanaticism as a 90's girl with a bedazzler. Whats not to love?
As with many things I like to have a variety of projects going on at once, at least 2 but no more than three. This is one of those projects, in addition to my first set of hoops and stays, my Niece III's dress. I recently got access to Janet Arnolds Patterns of fashion, but the idea of self drafting for an adult, combined with the added inches for my waist and a desire to have ALL THE THINGS NOW has led me to this. A tentative, still challenging but not quite sewing suicide. Heh, SEWicide.
We being with pattern; Simplicity 3725 size 4, View C.

Because I need SOMETHING to start with. (I thinks it more of a mental crutch now, but hey, at least I'm branching out, right?) The skirt is just going to be pleated to waist on hips, so I dont need those pieces, but the bodice is perfect. I used pieces 20; 4; 21; the stomacher piece and the sleeve ruffle.

First step. Bodice lining. Reviewing a great many different tutorials online (Will post at the bottom of my post) and reviewing Janet Arnold's PoF volume One, I get a basic idea of what needs to be done. The bodice lining is what you drape the watteau folds on, with lacing on the back to keep the bodice fitted and where its supposed to be.
Doing research into the era is hilarious. The sacque back gown and its fellows are all about suggesting relaxation and loose comfort while being secretly laced up and boned with an inch of their life. The comparison with today and its Walmart Shopping uniform of yoga pants and stained shirts is stark.
So, before I begin the dress the undergarments, it has been pounded into my head, is VITAL. Niece III is flat chested, being only a tiny five year old, so the stays are technically unnecessary, especially for this faux historical accuracy look. So, with a modified pocket hoop pattern I pulled together a quick, mini set. NOTE: At the time of sewing these I had already sew my full pink pocket hoops, and cut out and began assembling the Niece I and Niece II's pocket hoops as well. I was familiar with the pattern to say the least.


I used an undyed linen I found at goodwill, and green bias tape that I got for my hoops but never used. A snip snip here made a simple waistband, and a bit of leftover hoop steel and voila! A simplified pocket hoop!
The fabric for this gown is pink velvet with dull pink satin and pink thread, trimmed in pink with pinking.
Heh heh. See what I did there? I jest, hehehehe. So the pink velvet is SO TOTALLY poly, from a selection of three curtains that I bought for .69 cents at SALVATION ARMY WOOT!!!!! The dull pink satin I think I bought with a project in mind but I haven't the foggiest what it was.
My pinking shears have not arrived, so we're just worrying about the dress itself now.
Anyway, lining needs sewing together, didn't need the instructions as I wasn't closing the back. I folded it twice and sewed it down. Fitted to the munchkin.


Then I sewed eight or so eyelets (sloppily) and laced it with a bit of remaining green ribbon.

Meanwhile, I measured out two length of bias tape, thrifted naturally, and pleated a length of dull pink satin to both sides. Box pleat in the center, with pleats leading out and an inverted box pleat in the back. Sewed up one side of the skirt, working on the other.

Anyway, I cut out the stomacher thrice, once in the velvet and twice in the satin. I will half bone this, to give the dress something to 'hold' onto. Now, onto the meat of this dress. The Watteau Folds.
 First I looked for a tutorial. Did you know, googling 'How to Fold Watteau pleats' brings up a great big long list of NADA. ZILCH. A lot of pictures of the finished folds, and diagram of the unfolded pattern piece. I was looking for a step by step video, or picture tutorial. Uh, uh, Holly. You look in vain.
So I attempted to do it myself.


Okay, its hard to pleat without a body. I pinned it to my dress form, keeping an eye on the measurements to make sure it would fit Niece III and not me or anthing in between.
From extrapolating with my incomplete date, I managed a simple pleat. It LOOKED similar to the folds, but I KNEW there was this whole hidden depth thing that it lacked. There was this lift and drag that the dresses had that mine didn't.
So back to the drawing board.... GOOGLE HELP ME. And google delivered this::
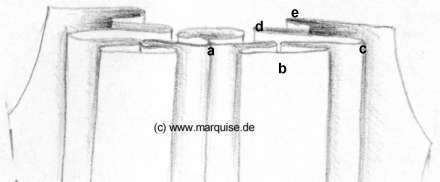
From "How to Make a Contouche" Found at http://www.marquise.de/en/1700/howto/frauen/contouche5.shtml. Thank you Marquise, you saved me. I unpleated all my work and used the above diagram to loosely pleat the watteau folds together.
THERE.

PERFECT.
Right? Right?! Much better. Next steps involve basting these folds down, sewing the bodice together and adding the sides and front. Robings need to be cut out and sewed. Stomacher boned and sewed. Trim created, sewed on.
Man, I just depressed myself with that list. Ugh.
18th century. Pocket Hoops, Big Hair, things embellished with the same zealous fanaticism as a 90's girl with a bedazzler. Whats not to love?
As with many things I like to have a variety of projects going on at once, at least 2 but no more than three. This is one of those projects, in addition to my first set of hoops and stays, my Niece III's dress. I recently got access to Janet Arnolds Patterns of fashion, but the idea of self drafting for an adult, combined with the added inches for my waist and a desire to have ALL THE THINGS NOW has led me to this. A tentative, still challenging but not quite sewing suicide. Heh, SEWicide.
We being with pattern; Simplicity 3725 size 4, View C.

Because I need SOMETHING to start with. (I thinks it more of a mental crutch now, but hey, at least I'm branching out, right?) The skirt is just going to be pleated to waist on hips, so I dont need those pieces, but the bodice is perfect. I used pieces 20; 4; 21; the stomacher piece and the sleeve ruffle.

First step. Bodice lining. Reviewing a great many different tutorials online (Will post at the bottom of my post) and reviewing Janet Arnold's PoF volume One, I get a basic idea of what needs to be done. The bodice lining is what you drape the watteau folds on, with lacing on the back to keep the bodice fitted and where its supposed to be.
Doing research into the era is hilarious. The sacque back gown and its fellows are all about suggesting relaxation and loose comfort while being secretly laced up and boned with an inch of their life. The comparison with today and its Walmart Shopping uniform of yoga pants and stained shirts is stark.
So, before I begin the dress the undergarments, it has been pounded into my head, is VITAL. Niece III is flat chested, being only a tiny five year old, so the stays are technically unnecessary, especially for this faux historical accuracy look. So, with a modified pocket hoop pattern I pulled together a quick, mini set. NOTE: At the time of sewing these I had already sew my full pink pocket hoops, and cut out and began assembling the Niece I and Niece II's pocket hoops as well. I was familiar with the pattern to say the least.


I used an undyed linen I found at goodwill, and green bias tape that I got for my hoops but never used. A snip snip here made a simple waistband, and a bit of leftover hoop steel and voila! A simplified pocket hoop!
The fabric for this gown is pink velvet with dull pink satin and pink thread, trimmed in pink with pinking.
Heh heh. See what I did there? I jest, hehehehe. So the pink velvet is SO TOTALLY poly, from a selection of three curtains that I bought for .69 cents at SALVATION ARMY WOOT!!!!! The dull pink satin I think I bought with a project in mind but I haven't the foggiest what it was.
My pinking shears have not arrived, so we're just worrying about the dress itself now.
Anyway, lining needs sewing together, didn't need the instructions as I wasn't closing the back. I folded it twice and sewed it down. Fitted to the munchkin.


Then I sewed eight or so eyelets (sloppily) and laced it with a bit of remaining green ribbon.

Meanwhile, I measured out two length of bias tape, thrifted naturally, and pleated a length of dull pink satin to both sides. Box pleat in the center, with pleats leading out and an inverted box pleat in the back. Sewed up one side of the skirt, working on the other.

Anyway, I cut out the stomacher thrice, once in the velvet and twice in the satin. I will half bone this, to give the dress something to 'hold' onto. Now, onto the meat of this dress. The Watteau Folds.

So I attempted to do it myself.


Okay, its hard to pleat without a body. I pinned it to my dress form, keeping an eye on the measurements to make sure it would fit Niece III and not me or anthing in between.
From extrapolating with my incomplete date, I managed a simple pleat. It LOOKED similar to the folds, but I KNEW there was this whole hidden depth thing that it lacked. There was this lift and drag that the dresses had that mine didn't.
So back to the drawing board.... GOOGLE HELP ME. And google delivered this::
From "How to Make a Contouche" Found at http://www.marquise.de/en/1700/howto/frauen/contouche5.shtml. Thank you Marquise, you saved me. I unpleated all my work and used the above diagram to loosely pleat the watteau folds together.
THERE.

PERFECT.
Right? Right?! Much better. Next steps involve basting these folds down, sewing the bodice together and adding the sides and front. Robings need to be cut out and sewed. Stomacher boned and sewed. Trim created, sewed on.
Man, I just depressed myself with that list. Ugh.


Comments
Post a Comment